Jon Elson's Machining Page
ジョン・エルソンの機械で加工していることができるページ
A Mini-EDM System
ミニ-EDM制度
Overview
概要
I built a small EDM system, primarily for
burning out broken-off taps in aluminum parts. But, now that I see how easily it
works, I can see many other things that it could be used for. I built this whole
system over a weekend, entirely out of parts I had laying around. (I do have a
lot of pieces, both electronic and mechanical.) 私は、主としてアルミニウム役目における軽く叩くことからもぎ取られる燃え尽きることのために、些細なEDM制度を築きました。しかし、どのくらい簡単にそれが機能するかを確認するので、私は、それがそうかもしれない他の多くの物が、使われるのを見ることができます。私は、週末の間この全体の制度を築きました、全く部分から、私は見近な賭けることをしました。(私は、本当に、電子に、また機械の多くの一個、両方を持っています。)
Electrode
電極
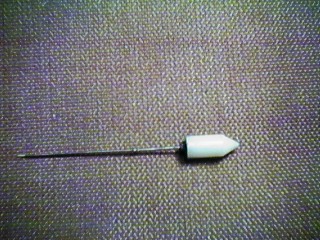 |
The electrode I made up consisted of a piece of .060 brazing wire soldered
into the socket of an 8-32 socket-head cap screw. I threaded this into a nylon
spacer that I happened to have, that already had an 8-32 threaded hole in it. I
put the spacer into the drill chuck on my mill. The nylon spacer is the
insulator that prevents the electrode from grounding out to the chuck, and the
rest of the milling machine. I connected the power supply to the electrode by
way of a soft stranded wire, so that the wire wouldn't deflect the brazing rod.
The end of the wire was stripped back about one inch, and the wire strands were
loosely wrapped around the brazing rod. This made a remarkably good electrical
contact, while allowing the brazing rod to turn freely. I could put just a
slight bend in the rod so that it would make a very slight (ie. .010") orbit if
the spindle were rotated. This seemed to get the best metal removal and depth
progress before the hole got filled with removed metal and shorted out.
私が上であるようにした電極は、一片の8-32のソケット-頭帽子ねじのソケットへハンダづけされた.060の蝋づけしている針金から構成されました。私がナイロン一定の間隔をあける物へこれに糸を通しました私は偶然持っていました、それはそれで8-32の糸を通された穴をすでに持っていました.だ私は、私のミルで一定の間隔をあける物をドリル・チャックに入れました。ナイロン一定の間隔をあける物は、電極がチャックにゴロでアウトになるのを防ぐ絶縁体、および残りのフライス盤です。私は、針金が蝋づけしている棒を逸れさないだろうように、静かに座礁させられた針金を経由して電源を電極につなぎました。針金の終り(端)は、剥かれた後ろの約ものインチでした、そして、針金こよりは、蝋づけしている棒の周りにゆるく包まれました。蝋づけしている棒に回転することを自由に可能にしている間に、これは、いちじるしくよい電気の接触をしました。それが作るように、私が棒でただの僅かな曲げを置くことができましたひとつのまさにその軽視(ie。.010インチ)もし心棒が回転させられたら、軌道に乗って下さい。穴が取り去られた金属でいっぱいになってそして外にショートする前に、これは、最もよい金属除去、および深さ進歩を得るようでした。 |
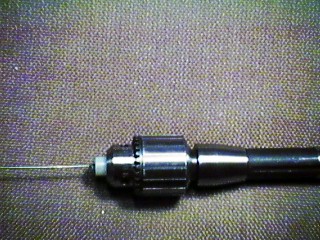 |
A view of the EDM electrode assembly in a Jacob's chuck. ジェイコブの顎の下を軽くつつくことにおけるEDM電極集会の眺め。 |
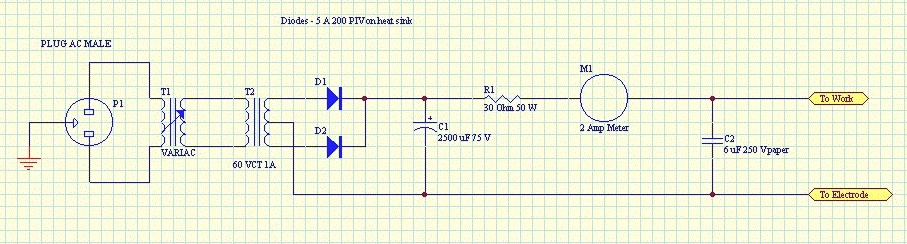
Power Supply
電源
| The power supply I threw together was quite simple. A variac (variable
autotransformer) is used to adjust output voltage. A 200 Watt variac (1-2 Amps
at 110 V) is quite adequate. A step-down transformer, which provides isolation,
is the next component. The one I used was center-tapped, allowing the use of 2
rectifiers. If your choice of transformer does not have the center tap, or the
voltage is too low when using it, you could use a bridge rectifier on the two
outer connections of the secondary to get higher voltage. A filter capacitor
provides smoothing of the DC voltage produced. A resistor allows the electrode
to short to the work without blowing fuses, and also moderates the flow of
current from the raw DC supply to the EDM capacitor and electrode. Choose a
resistance that will cause a short circuit current at least twice the desired
EDM current at the selected voltage. Then, make sure the wattage is sufficient
to prevent the resistor burning up during a few seconds of short circuit. With
the DC supply set to 30 Volts, a short would draw approximately 1 Amp, and since
P=I^^2 * R, that is about 30 W, using a 30 Ohm Resistor. The ammeter shows
current into the EDM capacitor. The EDM capacitor delivers short bursts of very
high current whenever the insulating film of the EDM fluid gets very thin
between the electrode and workpiece. 私が催した電源は、共にまったく単純でした。variac(変わりやすいautotransformer)を使って産出電圧を調節します。200ワットvariac(110 Vの1-2つのアンプ)は、まったく妥当です。孤立を提供する減少変化させる人は、次の構成要素です。使われたもの(それ)Iは、2人の修正者の使用を許して、中心を(が)軽く叩かれました。もし変化させる人のあなたの選択は、中心に軽く叩かせません、あるいは、それを使うときに、電圧があまりにも低ければ、あなたは、より高い電圧を得るために、二次的なものの2つの外側の関係で橋修正者を使うことができました。コンデンサーがDC電圧の滑かになることを提供するフィルターは、製造しました。抵抗器は、ヒューズを吹きつけることなしで仕事に電極にショートすることを可能にします、そして、加工してないDC供給からEDMコンデンサー、および電極へ流れの流れをまた和らげます。選ばれた電圧で最も小さな2度望まれたEDM流れのショート流れを引き起こすだろう抵抗を選んで下さい。それから、ワット数が十分なことを確かめてショートの少しの秒の間に抵抗器がぱっと燃え立つのを妨げて下さい。30ボルトへのDC供給仲間と、ショートは、約1つのアンプを描くでしょう、そして、P=I^^2*R以来、30台のオーム抵抗器を使って、それは約30 Wです。電流計は、EDMコンデンサーへ流れを見せます。EDM流体の絶縁している映画が電極と製造中の物の間にとても薄くなるときにはいつでも、EDMコンデンサーは、とても高い流れの短い破裂を届けます。 |
EDM Fluid
EDM流体
Not having distilled water around, I tried
tapwater. It was boiled away very quickly by electrolysis, and didn't do much
good even when it was there (perhaps all that bubbling got in the way of the EDM
process). I then tried the nearest thing at hand, which was "Alum-Tap", a light,
clear tapping fluid for aluminum. It must be pretty close to EDM fluid, because
it worked so well! It lasted a long time before being spattered away by the
gases generated by the EDM action. Most of the time, I only had to add a few
drops before the hole became filled with removed metal. 見近な蒸溜水を飲まないため、私はtapwaterを試みました。そこにあったときでさえ、それは、電気分解によってとても速く沸騰して蒸発して、であって、そしてよいことをおおいにしませんでした(たぶんすべてのその泡立つことがEDM過程の邪魔をしました)。私は、近づく最も近い物をその時に試みました、それは「ミョウバン-軽く叩くこと」、光、がアルミニウムのための流体の栓を抜くことをきれいにするということでした。それは、とても十分に機能したので、かなりEDM流体に近いに違いないです!それは、EDM活動によって生みだされたガスによって離れて撥ねかけられる前に長期持続しました。ほとんどの時間、私は、穴の前の少しのしずくが取り去られた金属でいっぱいになったと付け加えるだけでよかったです。
Operation
操作
The way I set this up was pretty much by
trial and error. But, here are my settings: I set the power supply for 30 Volts.
This seemed to give a very strong discharge action without producing too much
gas or heat. I lowered the electrode with my NC control's jog buttons until I
got electrode contact (indicated by about 1 Amp current suddenly appearing on
the ammeter). I then raised the electrode with a very slow jog until the current
dropped to zero. I then entered a manual command to advance the electrode at a
rate of about .010" / minute, and after a few seconds, the ammeter would show a
current of 1/4 to 1/2 amp. I would modulate the feedrate with the feedrate
override controls, attempting to keep the current within these limits. By
bending the electrode just a tiny bit, and running the mill's spindle at the
slowest speed (80 RPM), I could get any diameter hole I wanted. I set it to just
keep a tiny bit of the flank of the tap, but to burn out the entire web (central
portion) of the tap. This allowed me to pick the remaining part of the tap's
cutting edge out of the aluminum easily with a fine needle when the EDM
electrode had cut all the way through. Progress all the way through was evident
when the tool was still advancing with no EDM current. 私がこれを始めた方法は、試行錯誤でほとんどありました。しかし、ここに私の設定があります:私は、30ボルトで電源をセットしました。これは、多すぎる無駄話あるいは熱を生じることなしでとても強い荷上げ活動を行うようでした。電極を接触にするまで、私は、私のNC管理の揺れボタンで電極を低くしました(突然に電流計に現れる約1つのアンプ流れによって示された)。流れが目盛りをゼロに合わせるために落ちるまで、私は、とても遅い揺れでその時に電極を上げました。私は、約.010インチの割合の(から)前もっての電極への人力の命令にその時に入りました/分、および少しの秒の後の電流計は、1/4対1/2アンプの流れを見せるでしょう。私は、これらの境界内に流れを保つように試みて、feedrate手数料管理でfeedrateを調節するでしょう。ただのごく小さい少し、およびミルの最も遅い速さ(80 rpm)、Iの心棒を走らせることがどんな直径穴を得ることができた電極を曲げることによって、私は望みました。私は、軽く叩くことのわき腹のごく小さい少しをちょうど保って、しかし外に軽く叩くことの全体のウェブ(中心の一部分)を燃やすために、それをセットしました。これは、EDM電極が突っ切って(最後まで)ずっと進んだよい針で私にアルミニウムから残っている軽く叩くことの刃の一部分を簡単に抜き取らせました。それを通して(最後まで)ずっと進歩します明白です道具がまだEDM流れなしで進んでいたときに。
Since I didn't have a means of providing a flow of EDM fluid through such a
small electrode, I had to pull the electrode up every .025" or so, wipe out the
contaminated fluid with a paper towel, and then drip a few drops of the Alum-Tap
into the hole.
私がそのような小さい電極を通してEDM流体の流れを提供することの方法を持たなかったので、私がすべての.025インチ程度で電極を止めて、紙タオルで汚染された流体を壊滅させて、そしてその時に少しのしずくを落とす必要がありました、そのミョウバン-穴に接続して下さい。
To Home
家へ帰すこと